Friday, July 28, 2017

Studying Space, Cave Art, Bearded Dragons and more 4H


For art this week we looked at Chauvet cave art in France.

and

We watched a couple videos about this cave.  And then created our own cave art with paper bags and chalk pastels.


This is Brayden's art.  I had to show you... he decided that he needed to do a dinosaur.  So he chose to do Red Yoshi.  Not bad...😍


In Computer class, we learned about the difference between various computers and also operating systems.  Some of class was a little over Caty's head, or so I thought.  When it came time for review questions, she started answering questions that I couldn't remember.  I was worried about doing a group computer study, but it seemed to work really well this week.


Lydia decided to spend her money on a new friend.  She bought a baby Bearded Dragon.  She has decided to name her Ginger.


The Style Review for our 4H sewing/fashion projects was this week.  The girls did wonderful.  Caty earned an Honorable Mention for her sewing project.


Lydia earned 2nd place for her Fusing project.


And 2nd place for her beginners quilting project.


That night the girls had a sleepover.  I messed up and didn't reserve the cabana for the waterpark in time.  We have to have that for Joey.  I felt so bad.  So they threw a huge sleepover with their friends that were supposed to be going with us the next day.

There was Messy Twister


Lots of slime and art projects.

I decided to spend the next couple weeks studying Space/Astronomy, since we will be going to view the solar eclipse in Tennessee in August.  We will have most of the month of August off from book work due to the various fair schedules, riding competitions, and our trip to Tennessee.  This week we studied the sun, moon, and started going through the planets.  We are using the Apologia Astronomy program, just at a much faster pace.

Here they were learning about how solar eclipses work.


And then we also talked about Moon Phases and did the fun Oreo moon phases project.  The kids really like this one.


I got Lydia her first scientific calculator.  She's working in Pre-Algebra right now.  I think I may need it more than her...lol


There was some reading this week.  Caty's new Captain Underpants books came in.  Finn was making himself comfortable with her while she was reading.


Lydia also worked on her Horse Math.  Each week she has so many assignments out of this series.  She is loving it.


We also started a few projects for the county fair.  They were working on paper mache here.


Grooming the rabbits for showing in a couple weeks.


I'm feeling very stressed lately.  So I've cut back on the amount of "book work" we are doing during the week.  We need a little break for a few weeks.  But I can't give a full break, so we are working on craft/art projects for the open class at our county fair, math and reading/literature.  Oh and we are learning about the planets.

I'll be ok.... lol.... we all get into that burnout phase.  I'm getting burnt out.  Feeling it horribly.  But I will survive.  With the cutback schedule, and the upcoming trip we have planned, hopefully August will bring a little rest.  But it does feel like this summer has flown by.  It's half-way over!!

I hope everyone is having a wonderful and relaxing summer!!  See you next week.....

Linking up with other moms at:

Weekly Wrap-Up


Wednesday, July 26, 2017

The Crafty Classroom - How to Write a Paragraph Review


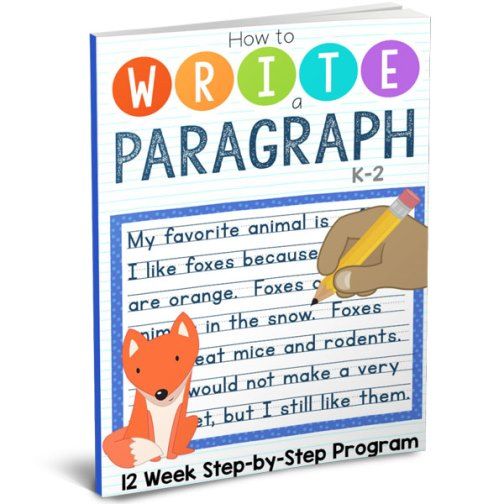
I will admit openly that I've been trying to pawn off teaching writing with the girls.  We recently had the opportunity to review a program from The Crafty Classroom called How to Write a Paragraph.  The girls have convinced me that we can do this!!


How to Write a Paragraph is a simple to use Kindergarten to 2nd grade curriculum that introduces students to the basic ideas of writing paragraphs.  This 12 week program, was written for those of us who take advantage of a 4 day a week school schedule.

The very basics are started with, including nouns and verbs.  Simple sentences then begin to grow as your student learns how to build their basic sentences with adjectives.

How to Write a Paragraph ($9.00) is a downloadable PDF file.  There was very little prep that I needed to do for these lesson.  Literally, I read the sheet for the week as I printed their worksheets.  That's it.  That's the kind of writing that I can teach!!

Included also is an outline so that you can schedule out How to Write a Paragraph in your lesson plans.  You know ahead of time what extra posters/worksheets that you need to print.

As you work your way through each week, your student will learn the basics of writing the different types of writing including narrative, opinion writing, informative and descriptive paragraphs.

As we have been working our way through, the ease of use has been awesome.  At the top of each worksheet page, there are reminders to read with your student.  As well as instructions for what you should be doing that day.


I know Lydia is a little older than the suggested age range.  But since she struggles sometimes with writing sentences, I decided that she could benefit from trying out How to Write a Paragraph.


The girls have enjoyed using How to Write a Paragraph very much.  Lydia liked the little bits of art on each page.  She said the projects that she was "assigned" to write were fun.  After the first 4 weeks, her sentences had totally made a turn around.  She started making more improvement, and it was quickly.

Lydia actually was able to work independently on a lot of the program, but they had fun working on How to Write a Paragraph together.  They would read their sentences out loud to each other.  Caty who balked a little when we got started, actually shocked herself.  (She shocked me too!)  Without even realizing it, she was writing a full sentence even though she was telling me that she could not spell.  The pictures above were taken when they were learning how to add adjectives to their sentences.  The charts that are included with How to Write a Paragraph can be printed in both color or black & white.  The girls really like these in color.

Int he picture above, you can see a hamburger hanging next to Lydia.  This was another poster from How to Write a Paragraph.  The girls thought the illustration of the hamburger was a great way to "sandwich" all their sentences together into a readable format.  I like the cute poster that I can keep pointing to when they are writing their paragraphs now.


After using this program for 8 weeks, I asked the girls if they were ready to start an online writing program that I found.  They both started whining and said they didn't want to take an online writing course.  They really liked the format of How to Write a Paragraph and they promised to continue working hard.  They want me to make sure I use the color posters as reminders for them.  I was shocked, I would figure they would want another person to teach them this.

In the short review period, the girls made great improvements!!  We plan to continue through the remainder of the Twelve week program, and see what else they need to make improvement on.    If you have an elementary student who is struggling in writing, be sure to check out How to Write a Paragraph.  You can view a sample of the program by visiting their website.

Several members of the Homeschool Review Crew were given the opportunity to review How to Write a Paragraph from The Crafty Classroom.  But this is not all they offer.  Other crew members reviewed their programs, such as Alphabet Curriculum notebook,  Learn to R.E.A.D. Curriculum notebook, or U.S.A. Curriculum bundle.

Crafty Classroom {Reviews}
Crew Disclaimer


ACTÍVA Products - ACTÍVA Products Rigid Wrap and CelluClay Quik-Sculpting Kit Review


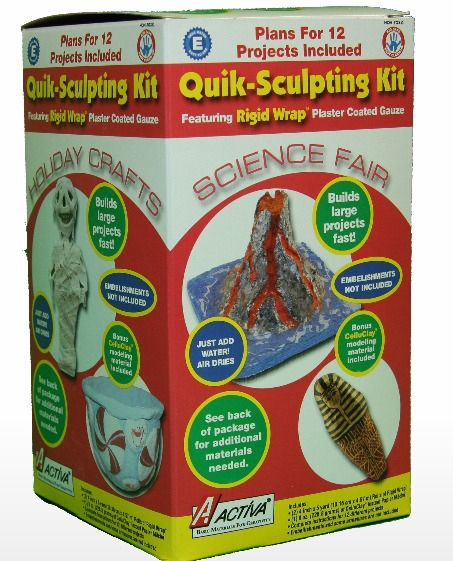
We recently had the opportunity to review some really fun building materials from ACTÍVA Products.  We used their ACTÍVA Products Rigid Wrap and CelluClay Quik-Sculpting Kit.


This ready to use paper mache kit, includes:
  • 2 - 4' rolls of Rigid Wrap
  • 8 oz. of Celluclay
  • Instruction booklet with suggestions for 12 projects


The instruction booklet included information on how to use each of the products.  Caty had been planning her county fair paper mache project.  So we got started.  She wanted to create an ice cream sundae.  So she got a bowl to create her paper mache bowl.  Following the directions, we got the bowl form ready with newspaper, measured out some of the rigid wrap and with her warm water ready, we got started.


The Rigid Wrap is rolled in a shape similar to that of a roll of gauze or even toilet paper.  So after putting her newspaper on, I helped Caty cut some strips of the rigid wrap to add to the bowl.  The Rigid Wrap is very easy to cut and a regular pair of scissors does the trick, so no extra equipment was needed.

The Rigid wrap dries fairly quickly.  Caty really made the newspaper wet, so I think that affected our dry time.  I left it dry for 24 hours to play safe, but it was actually dry before that.


The shape was very sturdy when we removed the form.


She crumpled newspaper to make her ice cream, and there is even a cherry.


The ice cream all dried quickly, just like the bowl.  We did have them dry separately on the plastic table cloth on her desk.  If we would have stacked them together wet, it would have been one big scoop of ice cream...lol

Caty attempted to add the Celluclay to her scoops of ice cream.   The Celluclay takes at least 24 hours to dry as well.  The idea of the Celluclay is to give the student option to add more details to their project.  On her ice cream, it didn't make much of an impact, but on a larger project I'm sure it works out much better.

Both elements of this paper mache kit are messy.   I highly recommend table cloth covers to help keep the work area clean.   We used just plastic table covers.  The Rigid Wrap does have a powder that comes off as you cut it.  Plus when you start adding the warm water, there's dripping from your hands and just a general mess.  But what did miss the mat was extremely easy to wipe up clean.

We use acrylics a lot in our house.  So this project was no different.   She chose her colors and started painting.  The rough surfaces were difficult in some spots for her to cover completely.  But she was able to paint all the individual items with regular paint brushes and acrylic paint.


The Rigid Wrap stayed hard and didn't get soft when she painted the ice cream or bowl.    She added some cotton balls and was able to rest her cherry on top to complete her rainbow sundae.


This is the first time we have ever worked with any type of kit for a paper mache project.  Generally we use some homemade glue and newspaper to make our projects.  But the ACTÍVA Products Rigid Wrap and CelluClay Quik-Sculpting Kit was so easy to use.  It's very economical also at only $11.90.  So far we have Caty's project finished and ready for show, and we have Lydia's project started.  Her project is larger in size than Caty's.  Even after all the wrap that Caty used and Lydia also we have a good amount of Rigid Wrap left.  It stores easily, and will last for a long time, as long as it doesn't get wet.

She covered a balloon partially with the Rigid Wrap, to make an egg shape.  I forgot to get a picture of the balloon while it was still inflated.


But it dried quickly and was ready to be painted the next morning.


I don't think that she smoothed it as well as she could have as she wet down the Rigid Wrap with warm water.  So there is some texture that she is working around.  She plans on using the CelluClay to work on her bird nest for the inside of her egg on the sticks.  She's making like a 3D model.


This is a work in progress for her though.

I personally think that ACTÍVA Products Rigid Wrap and CelluClay Quik-Sculpting Kit has been a great addition to our art/craft projects in our homeschool.  The ease of use (the kids could have completely done this without me) was awesome.  The quick dry time made it great for quick projects.   Depending on the size of your project, there is quite a bit of Rigid Wrap and Celluclay Quik-Sculpture  available in this kit.  We easily have enough left to start and most likely finish a medium sized project.  So if you have multiple kids like we do, this is a great economical value for you.

 ACTÍVA Products also sent us a great PDF that gives you suggestions.  The ACTÍVA Products Favorite Sculpture KIDS CRAFTS is a great addition to your art lesson, since its packed with suggestions on project ideas, even if you are just ordering to try out a new art supply.  We had our projects, already decided before we received our package of Rigid Wrap and Celluclay.  But this product would be great for a classroom setting, and if you want to give children any options for their projects, this book will do that.

I need to keep ACTÍVA Products Rigid Wrap and CelluClay Quik-Sculpting Kit  on my science/art shelf so that I have another kit available for those last minute project that always pop up.

Several members of the Homeschool Review Crew were given the opportunity to try out ACTÍVA Products Rigid Wrap and CelluClay Quik-Sculpting Kit,  Take a few moments to read how they used this product in their homes.

Rigid Wrap and CelluClay Quik-Sculpting Kit {ACTÍVA Products Reviews}
Crew Disclaimer